

Introduction
Building a ghillie suit requires a thorough understanding of the materials and techniques necessary to achieve camouflage, durability, and functionality. This guide will cover the essential supplies, preparation methods, and construction techniques to create an effective ghillie suit tailored to your specific needs. Whether you are preparing for airsoft, hunting, or military applications, this guide will ensure you have all the knowledge required to build a ghillie suit that meets your demands.
Supplies:
To construct a high-quality ghillie suit, gather the following materials:
• Nylon Netting with ¾”-1 ½” Hole Spacing: Netting traditionally serves as the foundation for attaching camouflaging materials to the ghillie suit. It is essential to choose netting with appropriate hole spacing, usually ranging from 3/4” to 1 1/2”. This netting can be sourced from various places, including hobby stores or Amazon, look for durable netting that may be used in football goals or military cargo nets, as these can withstand the rigours of outdoor use or you can use other types of netting like hunting blinds. Ensure the netting is a suitable colour for the environment you will be operating in, avoid black if possible.
• Camouflaging material: such as jute, burlap, synthetic fibres, AGM and raffia. The camouflaging material is a most vital component of your ghillie suit, as it provides the necessary concealment. Several types of materials can be used, including natural burlap, synthetic burlap, artificial leafs, jute, and raffia:
• Natural Burlap: This is the preferred choice for many due to its availability, old hessian sacks can be used, and it is easy to use. It is a plant-based fibre that can be dyed and manipulated to create effective camouflage. It may become heavy in wet environments as it tends to absorb water and become heavy. It also acts as insulation and can trap heat during hot summer months. Preparing burlap involves cutting it into strips and attaching it to the netting or base of the ghillie suit. There are two main methods for this:
1. Long Strips: Cut the burlap into long strips and tie them to the netting. This method creates a dense and effective camouflage layer but can be time-consuming.
2. Individual Fibres: Cut the burlap into smaller sections and pull apart the fibres to create individual strands. This method reduces material waste and allows for more intricate camouflage patterns.
• Synthetic ghillie fibres: Lighter weight and available in natural colours, these off the shelf options aimed at the ghillie suit market seem like a tempting option, but in my experience they tangle in thorns, branches and generally get the wearer caught up and reduce mobility. I am also not a fan of the reflective qualities of these fibre although they can be toned down or adjusted by dusting them with matt camo spray paint.
• Adaptive Ghillie Mesh: AGM is a special material that I manufacture that has a unique quality, it reflects light exactly light natural green vegetation. It is a great value product that will add a special touch to any kind of concealment build.
• Raffia adds natural textures and depth to your suit. It works very well at mimicking grass or dead foliage.
• Paracord: A versatile and strong cord used for attaching materials to the netting. Its high tensile strength ensures that your suit remains intact even in rugged conditions.
• Waterproof Adhesive: This will ensure your attachments stay in place even in wet conditions. Choose an adhesive that dries clear and remains flexible. I personally prefer Shoegoo, although hot glue guns also work.
• Padding: Essential for comfort and protection, especially in high-impact areas like elbows and knees. Foam padding that is sometimes used for lining draws is a popular choice.
• Scapa Tape: Versatile. It is harder to source outside of the UK, it is traditionally used by the British Military for tidying loose ends on webbing and camouflaging rifles..
• 2.5mm Plastic Cable Ties (dull brown or green color): Quick and easy fasteners for attaching materials to almost any clothing or webbing. Choose colours that blend with your suit.
• Elastic or webbing: for thumb-straps, stirrups, and vegetation loops
• Fabric Dye: Dyeing your camouflaging materials ensures they blend with the environment. Popular fabric dye brands include Rit and Dylon. These dyes are available in both liquid and powder forms and offer a wide range of colours. When dyeing materials, follow these steps for best results:
1. Preparation: Wear gloves and protective eyewear. Prepare your dye bath according to the manufacturer’s instructions, ensuring the water is hot enough to activate the dye.
2. Dyeing: Submerge the camouflaging material in the dye bath, stirring continuously to ensure even color distribution. Let the material soak for the recommended time.
3. Rinsing and Drying: Rinse the dyed material thoroughly with cold water until the water runs clear. Hang the material to dry, avoiding direct sunlight to prevent fading.
• Cordura Nylon or Canvas for Skid Pads: These materials provide additional durability to high-wear areas like elbows and knees. Cordura is particularly resistant to abrasion and tearing.
• Heavy-Duty Sewing Thread: Essential for all sewing tasks where glue does not work. Choose a strong thread that can withstand tough outdoor conditions. Upholstery thread offers superior strength and durability, while embroidery floss is easier to handle and knot, making it more suitable for intricate work.
• Safety Pins and Hole Punch: Useful for attaching and reinforcing materials. Safety pins can provide additional support, while a hole punch creates clean, round holes for lashing points. A crafting needle, or awl, often used in leather work, will be very useful for preparing holes for 2.5mm cable ties.
• Sewing Needles or machine: Various sizes of needles will be needed for different sewing tasks, from attaching netting to reinforcing seams.
• Camo Spray Paint Used to further camouflage the base uniform and materials. Choose flat, non-reflective colours to avoid catching the light. When choosing colours, consider the environment in which you will be using the ghillie suit and select shades that blend well with the surroundings. Spray paint is very useful for final colour adjustments.
Acrylic Ink in Sap Green, Olive, and muddy brown colours
• Scissors and seam ripper: Tools for removing existing stitches and cutting materials to size. Sharp scissors and a sturdy seam ripper will make your work easier and more precise.
• Fire Retardant Spray: Safety is important, especially when using natural materials like burlap and jute. Apply a fire retardant to your suit to reduce the risk of ignition.
• Insect repellent spray for fabrics
• Velcro Fasteners: Velcro fasteners are ideal for creating detachable elements or replacing buttons and zippers, or for transforming reinforced knee and elbow areas into small pockets that can be used for adding padding. Choose velcro that are durable and suitable for outdoor use, ensuring they can withstand the rigours of the field.
• Buckets: for dyeing fabrics
• Gloves: Protect your hands while working with various materials. Opt for gloves that offer both protection and dexterity.
• Boonie Hat: Provides a base for adding camouflage to your headgear. Boonie hats are versatile and have wide brims that can be used to attach additional materials.
Note: The base uniform is crucial to the overall functionality and effectiveness of the ghillie suit. We will discuss this in a later guide.
Construction Techniques

Attachment Methods:
When attaching camouflaging materials to the netting and base uniform, use large-eyed sewing needles, rubber gloves, and strong adhesive such as Shoegoo or a hot glue gun. Elastic bands, paracord and plastic cable ties can also be used to secure materials without compromising flexibility at a later date.
Ventilation:
Stay Cool and Comfortable: Ghillie suits can become uncomfortably warm, especially in hot environments. Adding vent panels can significantly improve comfort:
• Ventilation: Install mesh or fabric panels in non-essential areas of the suit to allow for better air circulation. This helps keep you cool and reduces the risk of overheating.
• Heat Management: Proper ventilation helps prevent heat exhaustion and discomfort, allowing you to stay focused and perform better during extended sessions. Consider what base layer you will be wearing under it; a thin wicking layer can work well during hot summer months but do not provide protection against thorns or stings. Thicker bdus can help protect you while crawling but do increase the possibility of heat build up.
Padding:
Add padding to key areas such as knees, elbows, and shoulders to enhance comfort and protection. Use rubberised toolbox liner or kitchen cabinet shelf liner, cut to size, and held together with duct tape. This padding should be flexible, washable, and fire retardant.
Skid Pads:
To protect high-wear areas such as elbows and knees, attach skid pads made from Cordura or heavy-duty canvas to the suit. These materials offer superior abrasion resistance and durability, ensuring your suit can withstand harsh conditions.
Elastic Bands:
Elastic bands can be used to create vegetation loops and secure sleeves, preventing them from riding up during movement. Ensure the bands are strong and flexible enough to hold the camouflaging material securely.
Fire Retardant:
Applying a high-quality fire retardant is essential for safety especially if the suit is to be used in ‘real world’ applications and not just for airsoft of paintball. Choose a fire retardant specifically designed for the type of material used in your ghillie suit. Follow the manufacturer’s instructions for application to ensure maximum effectiveness.
Insect Repellant: Apply insect repellent to the suit can protect you from nasty tick bites. Be sure to reapply every few weeks or after intense use of the suit.
Additional Tools and Supplies
Constructing a ghillie suit requires careful selection of materials and attention to detail in the assembly process. By following the guidelines outlined in this paper, you can create a durable, functional, and effective ghillie suit tailored to your specific needs. The next section will cover the base uniform, which serves as the foundation for your ghillie suit, ensuring optimal performance and comfort in the field.
Constructing Your Ghillie Suit
Constructing a ghillie suit will demands patience, precision, and an artistic touch. By following these instructions your ghillie suit is not only going to be effective but also tailored to your specific needs and environment.
Materials and Supplies
To embark on constructing your ghillie suit, gather all necessary materials. Here’s a list of many of the materials you may need:
Preparing the Base Uniform
1. Planning: Before starting, form a plan. Visualize your suit considering the environment and terrain where it will be used. Consider sketching a rough diagram indicating where each material will be placed. Consider the type of vegetation and terrain in your operating area to ensure your suit blends seamlessly.
2. Painting and Camouflaging: If your uniform is not already the perfect colour you may enhance it using appropriate camo spray paint. Apply light, even coats, let each layer dry completely before testing it in the environment before adding the next. Do not use black.
3. Removing Pockets and Buttons: Use scissors or seam ripper to remove unnecessary pockets and buttons/zippers, as these can snag on foliage and add extra insulation which we will not need. Consider replacing buttons with velcro for easier operation.
4. Reinforcement and Padding: Reinforce areas prone to wear, such as elbows and knees, with additional padding. Cut foam padding to the desired size and shape, then sew or glue it in place. Reinforce these areas further with Cordura nylon or canvas to protect against abrasion. Many uniforms will already have double layered material on knee and elbow areas, you can unpick one side of these and glue or sew velcro to create a pocket which you may put padding into.
5. Ventilation: Adding ventilation to your ghillie suit can significantly enhance comfort, especially during hot summer months. Cut ventilation holes in areas that do not compromise the suit’s camouflage effectiveness, such as underarms and the back. Use nylon netting or mesh, such as KMCS base mesh which is strong and breathable, to cover the holes from the inside, sewing it securely to maintain durability while allowing airflow.
6. Skid Pads: Adding skid pads will help protect high-wear areas and make it easier to low and belly crawl.. Measure and cut Cordura nylon or canvas to fit the knees, elbows, and other areas prone to abrasion. Sew these pads onto the suit or use glue, be sure to reinforce the edges with additional stitching. For added protection, consider layering foam padding beneath the skid pads before securing them in place.
Constructing the Ghillie Suit

1. Attaching the Netting: Spread your uniform flat on a clean surface and attach the nylon netting, ensuring it covers all areas you wish to camouflage. Secure the netting at regular intervals. To do this it can be stitched, glued or even cable ties could be considered if the base uniform is strong enough. Double-check the tension to ensure it lies flat against the uniform without any slack.
2. Camouflage Material: Prepare your camouflaging material by cutting it into various lengths of strips or individual fibers. If dyeing is necessary, follow the manufacturer’s instructions to achieve the desired colors.
3. Attaching the Camouflage: Start attaching the camouflaging material to the netting. Begin from the bottom and work your way up to prevent material from obstructing your progress. Vary the lengths and textures to create a natural, uneven appearance. Secure each piece with a knot, ensuring it’s tight and secure, or use 2.5mm cable ties for material that can not be tied. Aim for a balance between coverage and weight, avoid overloading.
4. Add Vegetation Loops: Create attachment points using paracord and attach them to the netting at regular intervals. These will allow you to add natural vegetation from your environment, enhancing the suit’s effectiveness. Ensure the points are evenly spaced and securely attached to support the weight of the vegetation without tearing. Consider leaving two longer strands of paracord that can be used to tie larger vegetation in place, as well as smaller loops to easily thread through vegetation. Glue or sew elastic loops for stuffing grass or ferns. Brown hair bands can be attached and also work well.
5. Detailing and Final Adjustments: Continuously step back and assess your work from a distance to identify any areas that need more or less material or adjustments. Make sure that the suit blends well with the intended environment by regularly testing it in a similar area to where it is likely to be used in. Trim any excess material that stands out or could catch on foliage. Test the suit in various lighting conditions to ensure it provides effective camouflage in all scenarios.
Tips for Effective Construction

• Patience is Key: Constructing a ghillie suit takes time and cannot be rushed. Allocate sufficient time for each step to ensure quality results. Set realistic milestones and take breaks, this will not be completed in a single session and will likely take several days but if constructed well your suit will provide you with a lifetime of use and will be a continuous evolutionary process over the course of years of use.
• Reinforce Critical Areas: Focus on reinforcing areas that will experience the most wear and tear, such as elbows and knees. Use additional layers of fabric and padding to extend the life of your suit and maintain its effectiveness.
• Avoid Overloading: Ensure your suit remains lightweight and flexible by not overloading it with too much material. A heavy suit can restrict movement and become uncomfortable during hot summer months. Balance coverage with practicality.
• Test and Adjust: Once the suit is constructed, test it in the intended environment. Move through various terrains, crouch, lie down, and observe your suit from different angles. Make necessary adjustments to improve its effectiveness, this may not just adding more material it may also mean trimming excess.
By following these detailed steps and tips, you will be able to construct a ghillie suit that provides superior camouflage and functionality.
Constructing Ghillie Suit Trousers with Padding and Vegetation Loops
Creating the trousers for your ghillie suit involves careful attention to detail, especially when adding padding for protection and comfort during use. Additionally, finishing the suit with loops for natural vegetation ensures effective camouflage in various environments.
Adding Padding to Trousers
The type of pad you choose can vary depending on your specific needs:
• Military-Issue Knee Pads: These provide excellent protection and are designed to fit into the pockets of military trousers. They offer a balance of flexibility and durability, however, some of the more modern design, such as what comes with Arktis Ranger Pants, are not designed for ghillie crawling and the plastic pads are prime to catching on vegetation as you crawl through it..
• Heavy-Duty Knee Pads: Made from robust materials, these knee pads offer maximum protection and comfort but may add bulk.
• Hybrid Knee Pads: Combining different materials, perhaps custom made by yourself, these pads can be customised for the perfect balance of comfort and protection for our specific needs as a ghillie sniper.
Preparing the Trousers
Skid pads will aid in crawling. The placement of the pads should cover the knees and potentially extend beyond to offer full protection including the lower thighs.
• Skid Pad Design: You can choose to use one long skid pad down each leg or segment the pads for increased flexibility. Consider the dimensions and design that best suit your movement needs.
Attaching the Skid Pads
To attach the skid pads to the trousers, follow these steps:
Apply Adhesive: Use waterproof adhesive, such as Shoegoo to, on the back on the skid pad. Position it carefully on the trousers, ensuring it covers the desired area. Press down firmly to secure.
Sewing for Durability: Once the adhesive has dried you may reinforce the attachment by sewing around the edges. Use heavy-duty thread and a sturdy needle to ensure the pads stay in place.
Inspect the pads to ensure they are firmly attached and do not restrict movement. Make any necessary adjustments to improve comfort and flexibility.
Adding Lashing Points

With the front of the trousers still facing down, lay your nylon netting across the trousers. Secure the netting to prevent it from shifting during use using lashing points:
-Tie Lashing Points: Use lengths of paracord sewn in place along the leg seams. Space the sewing points about every six inches apart. You may also consider using 2,5mm cable ties to secure paracord lashing point but sewing will be a stronger and more comfortable finish.
-Reinforce Lashing Points: Make sure to secure the lashing points firmly, reinforcing stitching or cable tie with shoegoo. These will help distribute the weight and maintain the suit’s integrity.
If your suit is to be used during summer months, at this point consider cutting ventilation holes out of the back of the trousers and stick and or sew breathable mesh over the hole on the inside of the trousers. You could add your netting over the top of these ventilation holes.
Adding Artificial Vegetation
Positioning: Begin tying the camouflaging material to the trousers starting at the mid-calf area. Ensure the material does not extend past the bottom hem of the trousers to avoid tripping hazards.
Securing the Material: Tie using knots to to the netting or use micro cable ties. Consider adding materials to the outside edges of the leg as this can help to conceal shadow when laying prone and help your form melt into the ground when lying in prone.
Avoiding Uniform Patterns: Vary the colors and textures to blend with the randomness of the natural environment.
Utilising Vegetation Loops
Remember, throughout the suit, attach additional vegetation loops to facilitate the use of natural foliage. Micro cable tying brown hairbands into position is a simple and effective technique that can be applied anywhere.
Maintaining your Ghillie Suit
• Inspect Regularly: After each use, inspect the suit for any damage or loose material. Make necessary repairs to maintain its effectiveness. Small holes can be patched easily with Shoegoo. Repairing small holes will prevent them catching and ripping in future.
• Store Properly: Store the suit in a dry, well ventilated location to prevent mould degrading the materials. I have produced a KMCS Ghillie Bag just for this purpose, it is breathable and helps prevent rot and mould forming but any none airtight bag can be used. Or leave it hung outside..
• Clean as Needed: If the suit becomes excessively dirty do not wash it in a machine or use detergents. Hosing it down outside and leaving it to dry will be all that is needed. Many of us even drag our suits through wet mud to weather it, a clean suit is generally not as effective as a dirty and dusty suit.
Lets dive deeper into Ghillie Suit considerations…
Artificial Vegetation:
Benefits of of using Artificial Vegetation: Artificial vegetation can offer a range of advantages, making it an excellent choice for enhancing your ghillie suit:
• Consistency and Longevity: Unlike natural vegetation, artificial elements do not wilt or change colour over time. This reliability is particularly useful during hot summer months when natural vegetation added to your suit will wilt very quickly
Here’s a detailed guide on how to use artificial vegetation on your ghillie suit:
• Selection: Choose vegetation that accurately matches the flora of the typical area you will be operating in. Common options include dried raffia grass, dried moss, or fake leafs, all of which are readily available at hobby and craft stores. These materials are favoured for their natural appearance and effectiveness in providing camouflage. The most important consideration when using natural vegetation is to ensure the leafs are a natural colour, only by testing them in the natural environment will you be sure that the leafs you have selected will work. Also, it is worth remembering that real leafs react to light very differently to artificial leafs. What may appear to be a perfect match in the shade will wash out in direct sunlight, and visa versa, what may work well in sunlight will be too vivid in the shade. This is the reason I developed Adaptive Ghillie Mesh, or AGM, which is a cost effective way of replicating the way natural vegetation reacts to lighting conditions. Interestingly AGM also reacts perfectly like natural green vegetation under IR lighting through night vision goggles.
Dead leaf litter is easier to replicate than greens. Cottons, dyed the correct colours, do a great job of mimicking dead leafs.
• Attachment Methods: Secure the vegetation using cable ties, netting, glue or fabric loops sewn onto your ghillie suit, webbing or equipment. My preferred method is micro cable ties, 2.5mm brown to be exact. This method allows for easy replacement and adjustment of the vegetation as the seasons change, while still ensuring that your camouflage remains effective and in place even after prolonged use.
If you want to attach to webbing; a crafting needle, the kind used for leather working, can be used to push hole through to thread 2.5mm cable ties.
• Layering Techniques: Consider layering different types of artificial vegetation to create a more realistic and three-dimensional camouflage effect. This can enhance the suit’s ability to break up your outline and blend with the environment.
• Durability Considerations: Ensure the vegetation you select is durable enough to withstand the physical demands of being dragged along the ground and contact with the environment and elements, Many fake leafs can easily fall apart, test them before spending many hours constructing your suit and later finding out you have built something that will not last.
Raffia: Raffia does an excellent job of mimicking dead grass or thin sticks. Even applied in small amounts it can add texture and depth to your suit. But you must ensure the colour is correct. Natural raffia straight off the shelf of a hobby store will be too pale and vivid, it will need colouring and potentially thinning. Various ways of colouring raffia can be used from watered down acrylic ink, dye or simply soaking it in hot tea or coffee can produce the desired result, but it can get messy and you will need somewhere to hang and dry it… After it has been coloured combing it with a wire brush will thin it out and produce a more natural texture.
Protective Padding
Comfort and Protection: To use your ghillie suit effectively you will often need to crawl, crouch, and lie prone. Adding protective padding to your ghillie suit can significantly enhance comfort and safety.
• Key Areas for Padding: Focus on padding high-impact areas such as the knees and elbows, possibly the chest. These are the points most likely to come into contact with the ground and other surfaces. During summer months when temperatures are high you may be wearing a thin base layer, be aware that thorns and stingers may get through and cause irritations. The same for trousers, you may find more expensive tactical clothing may be very flexible and comfortable to wear but while ghillie sniping more robust, and often less expensive, clothing may be more suitable for crawling around in thorn bushes. An experience I personally have is between Helikon and Direct Action Wildwood trousers. I used cheaper Helikon trousers for two season and felt like upgrading them to their sister company’s offering, which were more expensive. On first fitting they felt fantastic, great pockets, great features and very flexible in the right areas. Perfect for crawling around, I felt… But when testing in the field I found thorns and stinging nettles went straight through them, so I have switched back to Helikon.
An historical example of using tough clothing for difficult conditions is US Navy SEALS in Vietnam who wore denim jeans for this exact reason (as well as looking cool I am sure, but the example still stands). Although I would not recommend denim, robust bdus that protect from stings and scratches are advisable of gucci fabrics.
• Materials for Padding: Use foam or rubber padding for effective protection. There are quite expensive knee pads designed for combat trousers available to buy on the market but I have found simple rubber padding, the sort of thing that you may find in a DIY store for lining drawers works great, or perhaps even a piece of old carpet. These materials offer a good balance between comfort and durability without significantly increasing the weight or bulk of your suit. You can either sew on a pocket to insert them or many combat trousers already come with reinforced patches on the knees and elbows; carefully unpick the patch on one side and insert your padding. Either sew it back up or glue velcro strips to close the opening to easily swap the padding out in future.
If your trousers do not have reinforced patches you can simply glue the padding in place. It is important to make sure the padding does not restrict your movement or flexibility.
Adding Natural Veg in field:
There are countless of ways to select and add natural vegetation, trial and testing yourself is the best way to learn. your ghillie
Choosing Vegetation:
- Select vegetation based on where you will be operating.
Avoiding Contrasts:
- Match the vegetation added to the predominant colors in your environment. Avoid bright greens in tan areas or light tans in green areas. For example, do not load up with ferns if you know you will be moving through dark ivy covered woodland.
Key Areas to Veg:
- Focus on head and shoulders to break up the human silhouette, but also consider stuffing the chest area using webbing if you are going to be upright stalking..
- Vegging up pants is usually unnecessary but not to be dismissed, depending on your hide position or the environment you will be stalking through. For example, when stalking through woodland with lots of tree trunks I will rarely stuff natural veg into my legs as legs will naturally appear like tree trunks, or if moving through heavy fern fields where legs will usually be covered by the environment. Situations where I may veg up legs could be grass fields or while in a seated hide position where my legs may be crossed in front of me or used as a rifle brace and when they are stuffed with natural veg in this situation can screen unnatural shadows that can form under the head and rifle/or viewing equipment ..
Layering Vegetation:
- Start with a base of grass if it is in the area before adding branches and other vegetation.
- Grass should always be the first layer as it doesn’t grow on top of other plants.
Techniques for Effective Vegetationing (is that even a word?)
Vegetating from Top Down:
- Begin with the head and shoulders, the most visible parts.
- Ensure these areas are well vegetated as they will be exposed during movement and observation.
Distribute Vegetation Evenly:
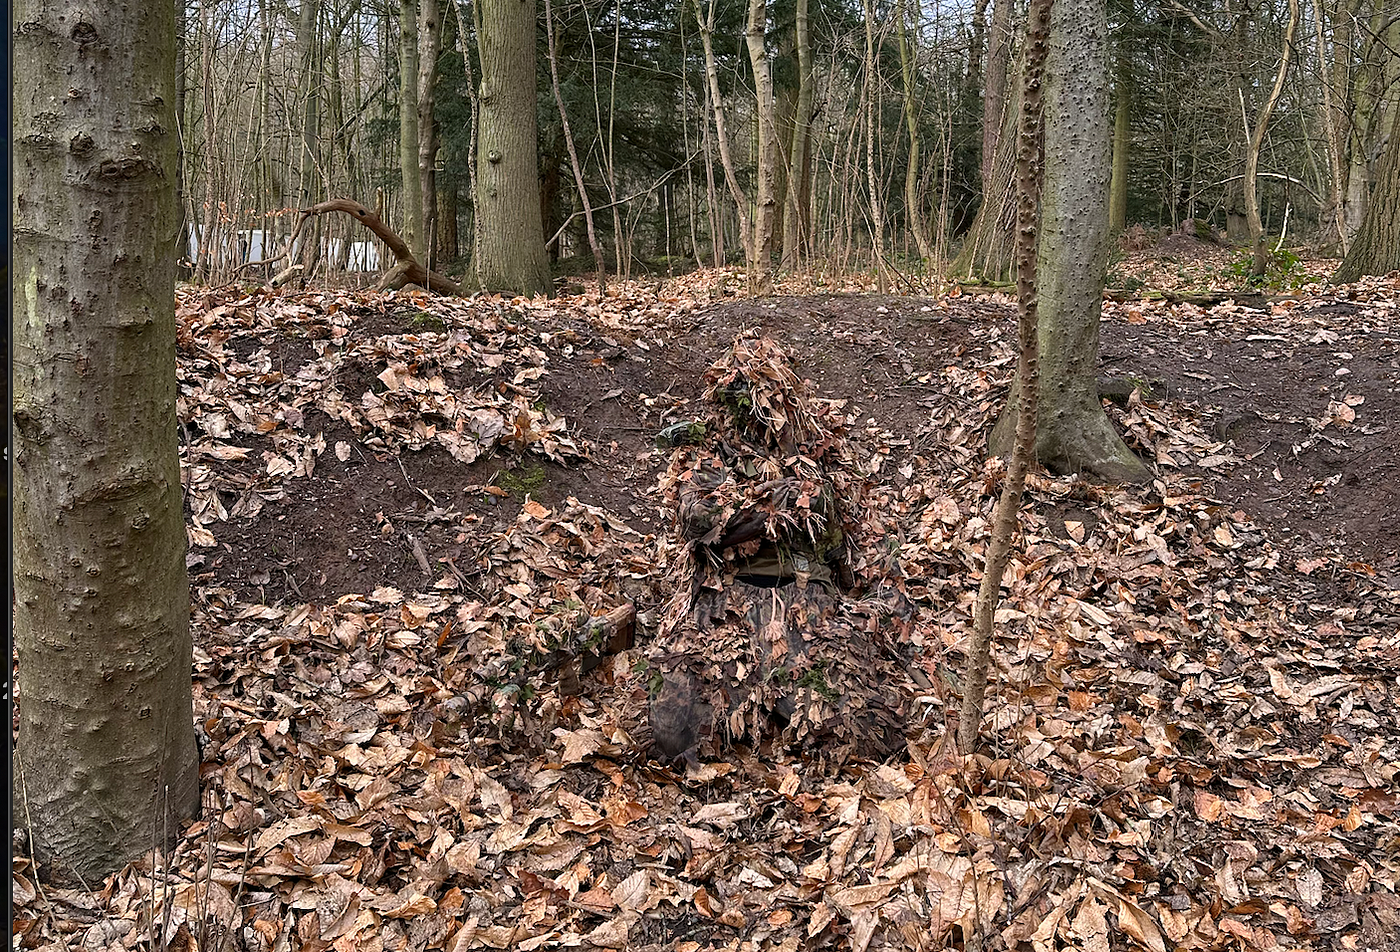
- Apply small amounts of vegetation across the suit rather than clumping it in one spot. Do not be afraid to leave patches uncovered revealing your camouflage bdu underneath as this can produce a transparent like effect at distance and also aid in disrupting the human shape. Think of a human shaped cloud in the sky, it will still be recognised as a human, and it works the same with a ghillie suit. A perfectly ghillied human form is still recognisable as a human if it retains it’s human shape.
- Use paracord to tie vegetation; it’s durable and easy to use. Elastic loops can be used to stuff grass or bunches of ferns into.
Direction of Vegetation:
- Ensure grass and other elements follow their natural growth direction.
- Do not leave veg in clumps, spread out bundles to mimic the natural, uneven lengths of naturally growing vegetation.
Final Steps and Testing
- Testing Your Camouflaged Ghillie Suit:
- Once vegetated, place your suit in the environment and step away.
- Is it difficult to spot? If you can easily see it, go back to the drawing board and start again or adjust.
- Suiting Up:
- After preparing and testing, suit up and ensure your vegetation stays intact.
Practical Tips for Ghillie Suit Preparation and thoughts on use.
- Avoiding Shine:
- Eliminate anything shiny as it stands out in nature. Use tape to cover unnatural buckles.
- Check for and remove any reflective materials from your gear.
- Movement and Concealment:
- Minimise movement, it doesn’t matter how good your ghillie suit is movement is going to give you away. Especially across open areas.
- Move directly towards your objective to reduce noticeable movement. Side to side is easier to detect than slowly towards. Consider using ‘tree walking’ technique; position a tree between yourself and the target and walk slowly towards the tree to close distance. This can be effective but be aware you may lose sight of your target, the blocking tree works to block line of sight both ways.
- Weather your ghillie suit:
- No matter how perfectly made your suit is almost certainly it will get better with age. You can speed that up by using wet weather conditions to drag your suit through muddy puddles and leave to dry after..
- Weather jute, you could bury a hessian suit in a thick muddy puddle, or leave submerged in a muddy pond for several days before hanging to dry. Ensure you cut hessian to appropriate random lengths. Perfectly formed strands looking like your ghillie suit has visited a barber shop for a short back and side and hair wash will be very ineffective in the field.
- Face Painting:
- Paint your face to blend with your environment, covering all exposed skin. Or wear a balaclava.
Custom Suits for Different Environments: Depending on the terrain and conditions you will be operating in, you might need to tailor your ghillie suit to suit specific environments:
• Woodland Suits: For dense forested areas, use dark greens and brown base layer to match the foliage. Incorporate artificial elements as well as added natural vegetation like leaves, twigs, and forest floor debris to enhance your camouflage.
• Desert Suits: For arid, sandy environments, incorporate tans and light browns to blend with the desert terrain. Materials like burlap and tan-dyed raffia grass can be particularly effective.
• Urban Suits: In urban settings, use greys, blacks, and muted colors to camouflage against concrete, metal, and other urban materials. Incorporate materials that mimic the textures and colors of urban infrastructure. Depending on the time of year and level of decay and how over grown the area is you may wish to add artificial vegetation.
Gloves and Hand Protection
Protecting your hands is crucial while crawling around and stalking, both for camouflage and safety:
• Camouflage Gloves: Choose gloves that match the color scheme of your ghillie suit. This helps maintain your overall camouflage and prevents your hands from standing out.
• Dexterity and Functionality: Ensure the gloves allow you to handle your gun and other gear effectively. Gloves with good dexterity and grip are essential for maintaining accuracy and control during shooting. During summer months you may consider cutting away the ends of the thumb and fingers to improve dexterity.
Thumb and Foot Straps: These straps help keep your suit in place and enhance mobility, which is vital while crawling around:
• Thumb Straps: Sew thumb straps at the wrist to keep sleeves from riding up. This ensures your wrists remain covered and camouflaged at all times.
• Foot Straps: Attach foot straps to secure the trousers under your boots. This prevents the trousers from riding up while crawling backwards.
Additional Features and equipment
Pockets: Adding custom pockets to your webbing, ghillie or even your hat can be practical for storing small items such as magazines, batteries, radios or insect repellent. This keeps essential gear accessible without compromising your camouflage or mobility.
Hydration Packs: Staying hydrated is crucial. Integrate a hydration pack into your concealment system for easy access to water. This allows you to stay hydrated without breaking your cover. Either wear a hydro pack under your suit or integrate the camelbak into a part of your system by ghillieing up the camelbak and wearing it on top of a lighter leaf suit or BDUs. Cover it in netting using cable ties or glue and use the same techniques for building it up as you use to make a full ghillie suit, If you add para cord strands and elastic bands you can easily add natural vegetation to the pack in field. It is possible to consider the camelbak, if ghillied and constructed well, to be the main part of your concealment system. Add balaclava and or ghillie boonie, and you have a lightweight and effective system to break up your shape and camouflage your form, which you are able to add natural veg to, while retaining mobility and heat management.
Weapon and equipment Covers: Camouflaging your equipment is as important as camouflaging yourself. Use wraps, fabric, or other materials to cover your weapon, ensuring it blends with your surroundings and does not give away your position. If possible camouflage paint can be used to cover large black guns. Simple bungee cords or elastic bands can be added to equipment to add natural veg. We will take a closer look at weapon wraps in a future paper.
Quick Removal Systems: In case of emergencies, be sure that you can quickly remove your ghillie suit quickly. Ensure buckles are easy to reach and smock and pants can be quickly slipped off without having to unpick knots. This is crucial for safety and can be the difference between quick mobility and being stuck in an uncomfortable situation.
Conclusion
Customising your ghillie suit enhances both your concealment and comfort, making you more effective on the field. By considering the specific needs of airsoft gameplay, such as durability, comfort, and effective camouflage, you can create a suit that not only hides you from opponents but also supports your movements and strategies. This tailored approach ensures you remain hidden, comfortable, and prepared, giving you a significant edge in your airsoft games.